JBCL Menu Help

JBCL General Information:
JBCL Program Information:
JBCL Programs for BCL Users:
JBCL Useful
Downloads
Overview
JBCL Software
A suite of programs
1 - General programs useful for anyone
- Professional Time Recording
- Miscellaneous Notes keeping and searching
- Automated Time recording
- Event scheduler for commands and reminders
- A good Calculator
- Desktop Clocks
- Interscreen messaging system
- Automated backups
2 - A wonderful modern addon to the classic Beyond (BCL) software.
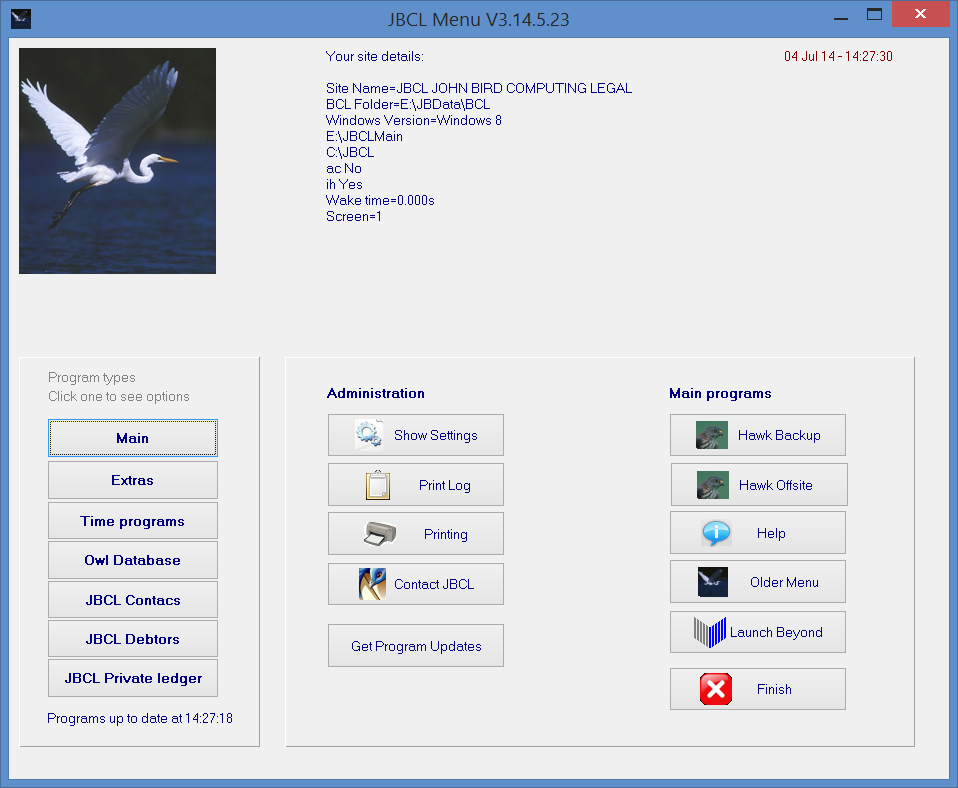
Like the Beyond menu, the software in controlled from a main menu:
This adds some extra screens to the JBCL menu (more buttons on the left)
To Index
Altering Setups
How to Change Main JBCL Setups
Click the button "Show Setups" . This will show you the main settings
for where the JBCL files are. Usually installing JBCL and running it
will set these up automatically.
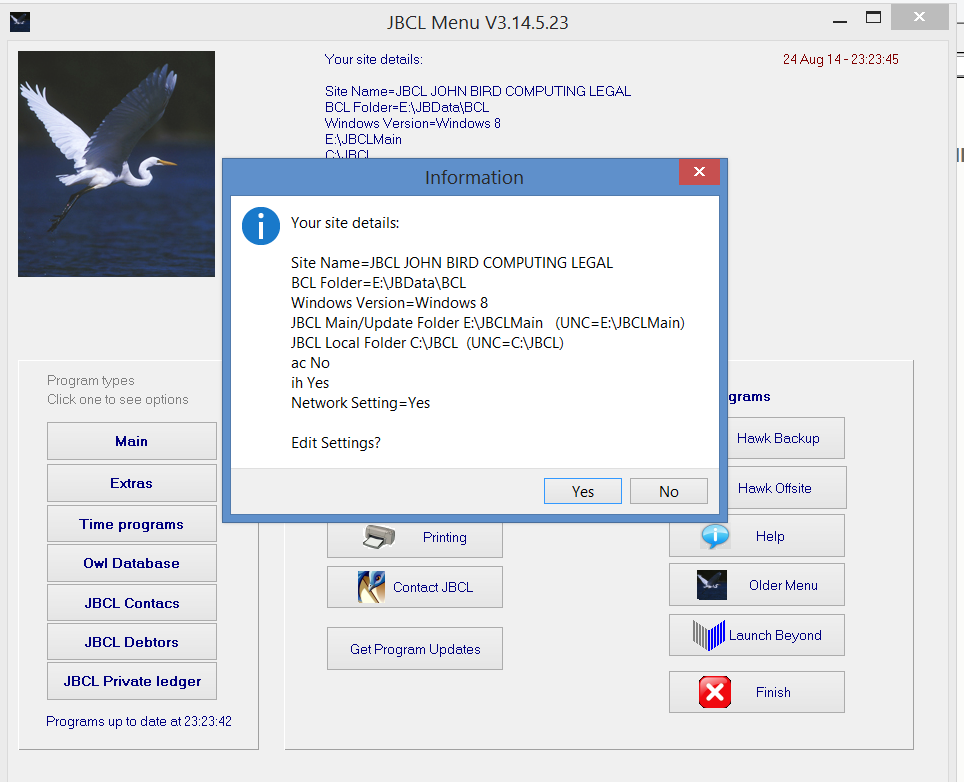
How to change JBCL setup
If you click "Yes" to Edit these settings, then you see:
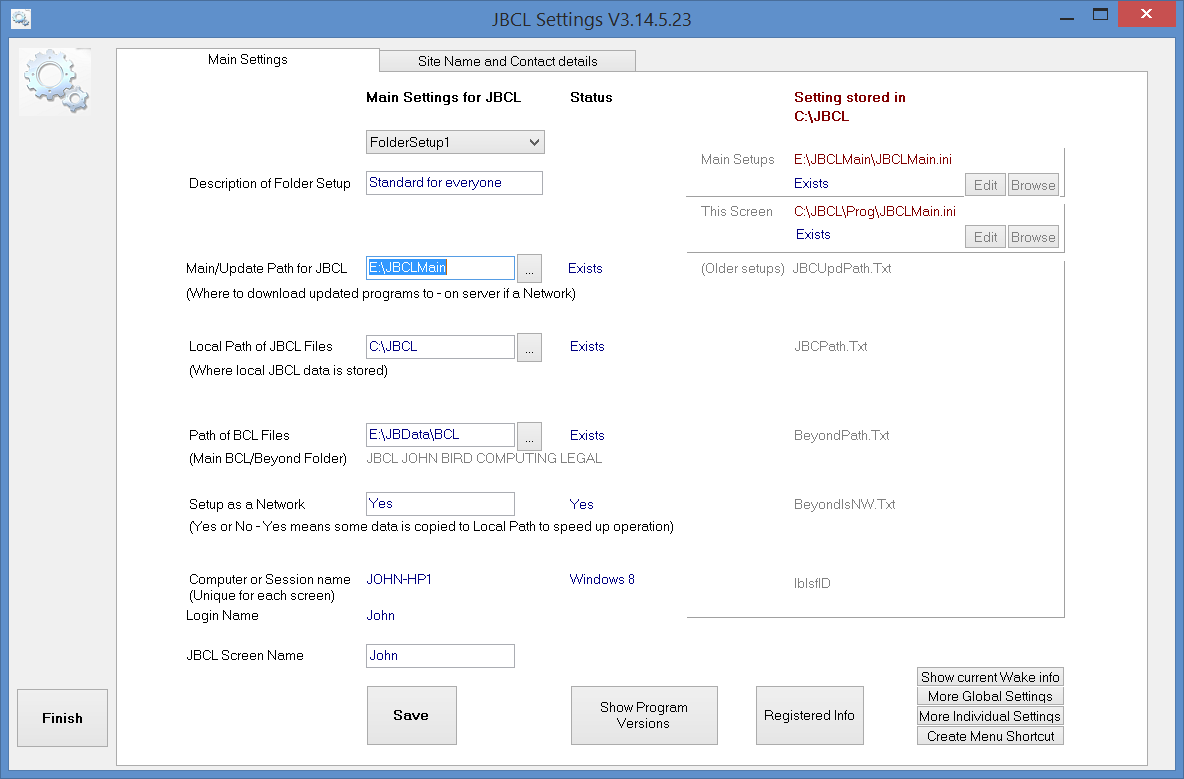
The default settings when installing are designed to fit the great majority
of sites.
If you are on a Network then the drive letter of the Beyond Folder will
usually be different, eg F:\SB or M:\BEYOND.
(In BCL - The Network drive letter can be found by looking at the
properties of the shortcut used to start Beyond, or in the Beyond
Administration menu look at the top right of the screen.
Note for Network Administrators
Like the Beyond Software, the JBCL software is a breeze to
administer. All the files reside in one folder on the server.
The only thing that is installed on the individual PC's is the
shortcut to start JBCL, which points to the startup program on the Server.
Note that to further streamline JBCL and to minimise the load on the
network, when JBCL starts it automatically copies working programs to a
folder on the individual PC and runs them from the local PC. This
means that they run even faster. However nothing needs to be installed
or updated on the individual PC's by you. The JBCL startup does this
automatically (This is what happens when you see the brief display
checking files with you click on the JBCL
Start icon). Also the registering of programs is also centralised
on the server.
If you wish to check what JBCL programs you are registered for, click the
"Registered Info" button which will show information like:

To Index
How to Use JBCL
The programs are divided into sections, each section is selected
by a button on the left. Click this to see the page of program options
on the right.
Main shows a screen with the main administration and general
programs
Extras has some useful extra
programs, such as calculator and options to lock or turn off the computer
etc
Time Programs has a clock, time
recording programs, scheduler
The buttons below that are for specific JBCL programs
To Index
The
Sections below describe some of the main programs
JBCL Contacs Inquiry
The Contacs Inquiry has its own help system.
See
More
Help for the JBCL Contacs Inquiry
To Index
JBCL Hawk backup
This program comes in two flavours - both look similar but do different
types of backup:
JBCL Hawk Offsite Backup
for general users (Can be used for backing up
BCL, JBCL or any folders you wish to use it for - it is customisable)
JBCL Hawk Backup
(For users of BCL software only, as it is highly
tailored to how the BCL software operates)
Hawk Offsite Backup (for General Users)
This program can be used to make lightning backups of important folders
to a USB drive.
- The idea for this program came from some users of JBCL software after
the Christchurch earthquake of 22 Feb 2011 where offices with tape or
internet backups were left with no accessible backups that were up to
date.
- Tape backups made nightly were not of much use as the tapes were
available but the tape drive was inaccessible on a server in a damaged
office that could not be accessed
- Restoring tape backups usually involves not only access to the tape
drive, but also the tape backup software (which is usually expensive and
licenced only for the server) and often the network providers to run the
restore. In some cases many or all of these were not available.
- Offsite backups on external drives or CD's or DVD's were a week or
more old
- Some sites with offsite backups made over the internet to a network
providers server also found these were inaccessible as both offices were
damaged and inaccessible.
- The JBCL Hawk Backup program (the sister program to the Offsite backup
program) makes multiple snapshot backups during a day but these backups
are on the server
- In all cases sites eventually recovered servers and resumed work, but
having an external drive with a backup from the same day or day before
would have been a great advantage.
The idea of this program is to allow a very quick backup of important
folders to an external USB drive - a pen drive or external hard disk that an
operator or owner can take home from the office each day.
- This backup can be tailored for any site - they can set up several
different backups and choose themselves how quick or comprehensive each
one is
- When first run, the program automatically sets up Full and Quick
backups for JBCL and BCL files - these give excellent examples how to
set these up
- The backups are manual - that is an operator can run this quickly when
they know they have finished work for the day before leaving the office
with the external drive.
- The backups are very quick to run and require just 2 or 3 clicks.
- An operator can run a comprehensive backup eg once a week or once a
month, and a quick important data backup daily
- The backup is compressed using the standard ZIP format, so that
it can be opened and used on any computer running Windows 7, 8 or
Windows 10
- Doing a backup will keep the previous backup, renamed with a -OLD
filename so that even if the current backup fails the previous backup
will be present.
- The program comes with easy options to do two kinds of backups -
either a full backup of a folder, or just a quick backup of core data
files and settings.
- The idea is that in case of fire or emergency, the USB drive can be
grabbed while running from the office, and will contain a very recent
backup.
- It would be possible to have these backups run automatically as well
(eg at 4:50pm) - however being quick and simple to run manually
this may be preferred as the operator still needs to take the drive
with them ideally which cannot be automated!
- To be added will be an extra option to copy backup files to a remote
server out of town - this requires a licence to store files on a secure
server farm eg in the North Island and might cost a site around
$75/month. (We will be looking for best deals on this).
Contact JBCL if you are interested in this option.
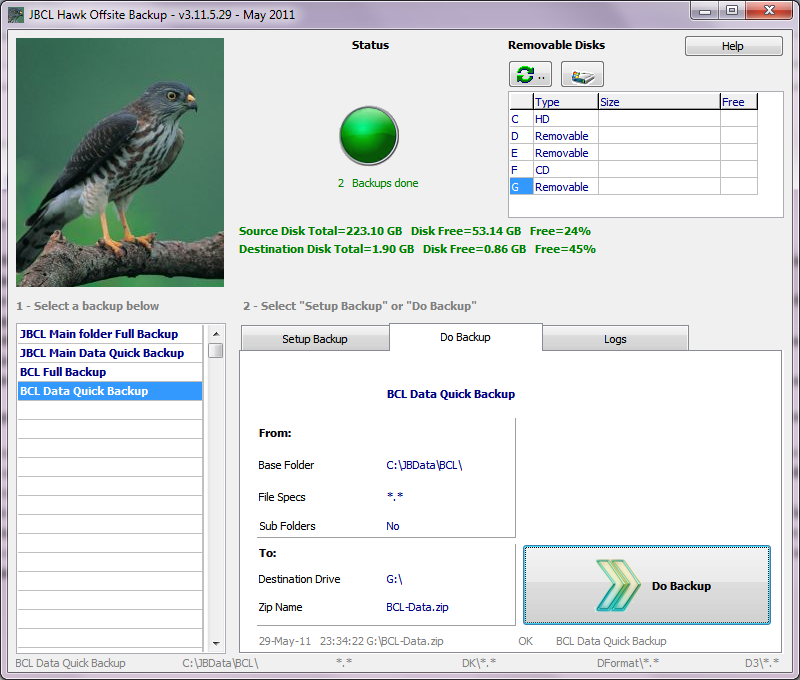
Main screen:
To do a backup you select one from the left hand list, and then click "Do
Backup"
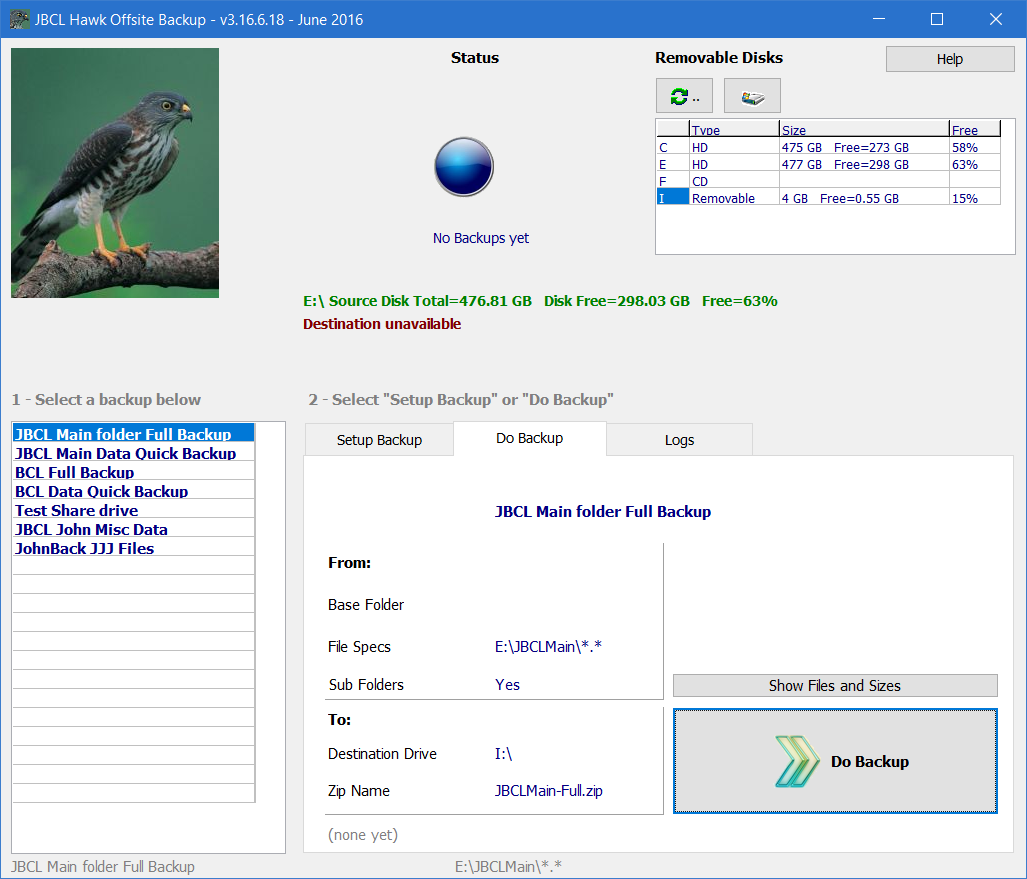
After a backup has run:
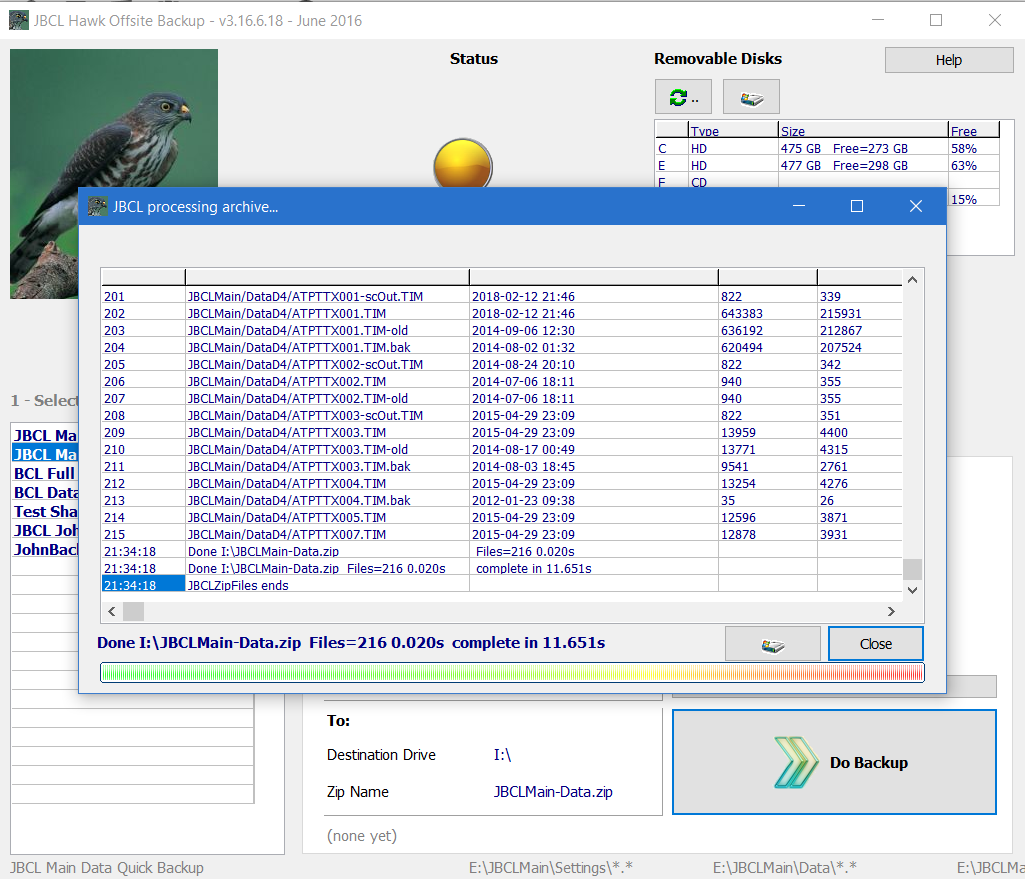
Notes:
- The files backed up are shown in the list on the screen. The
right two columns are the uncompressed size and the compressed size.
- The summary shows the number of files and the time taken.
- The Windows Disk icon button will open the backup archive using
Windows Explorer or Winzip so you can check files have been backed up.
It is a good idea to check the files are being backed up!
- Click the Close button to close the information window and do another
backup.
Main screen after two backups have been done:
How to setup a
backup:
There are two main options in the program - backup everything under a
specified folder, or backup certain important files only.
When you first run the program, it will set up the first two backups as a
default set. You can add more yourself.
Here is an example of a full backup:
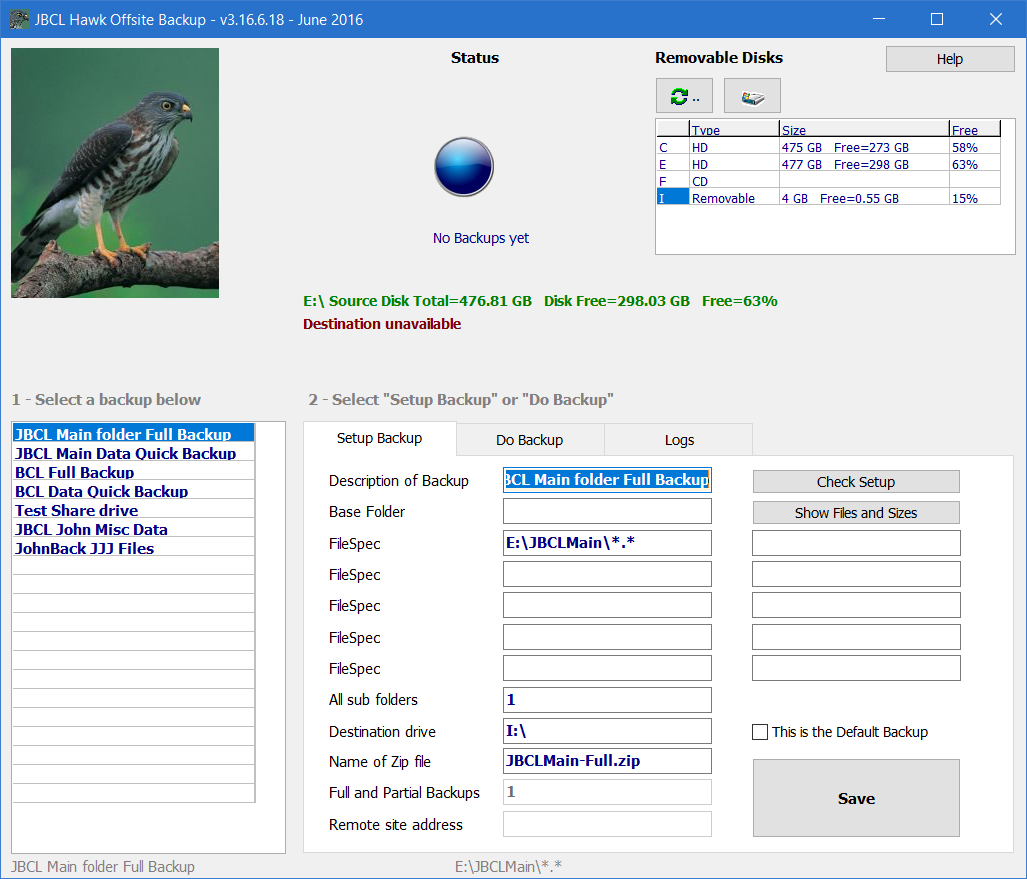
Explanation of the options:
Description - This is the
description that will be shown on the list on the left of the screen, so
make it clear and concise what it backs up
Base Folder - (optional) if
set, the Filespecs that follow will be added to this, eg if the Base Folder
is set to F:\Data and the first Filespec
is set to Fred-Data\*.* then the files that will be
backed up willl be F:\Data\Fred-Data\*.*
FileSpec - you can specify up to 10
different file specifications. Note only one is usually needed if you
are doing a recursive backup
You can use wild cards - eg *.DAT in one and *.DBF
in another.
Usually one file specification is enough - only use as
many as are needed
Each of these will be added to the Base Folder to find
the files to back up.
All sub folders - set this to 0 to
only back up the files speciified,
set this to 1 to backup all folders below this one as
well
Destination Drive - this is where
the backup zip file will be written to.
If you are not sure of the drive letter, look at the
small list at the top of the screen,
or click the Windows Disk button at the top of the
screen, which will open a "My Computer" window to show the drives attached.
Name of Zip file - this must be a
valid filename and must have a .zip extension.
To avoid ambiguities do not have spaces in the filename,
use letters, numbers and - or _ characters only (ie the usual rules for a
valid filename).
This will be combined with the desttination Drive to give
the final filename - eg
destination drive G:\
and zip file name
JBCLMain-Full.zip
will create a zip archive called
G:\JBCLMain-Full.zip
Full and partial backups - this is
for future use (not implemented yet).
This could add the option to do incremental backups so
that files can be backed up even more quickly.
The current full and quick backup options are already
pretty fast so that this may not be needed.
Remote Site address - this is for
future use (not implemented yet).
This will add the ability to upload the zip file to a
remote web site (using FTP communication).
Hawk Backup (for BCL Users)
(older version of help)
The idea of this program is that you just
run this program and do your work, and it will keep snapshot backups as
you work:
It will do needed backups automatically - all you have to do
is start the program.
- This program knows how the BCL system operates, and backs up company
files after they have been used
- The default settings are to do backups for BCL Debtors,
Private Ledger, Contacs and Beyond Database/ (JBC Owl Database)
- These backups are the same type as the BCL General Backup/Restore
Program option "Backup ledger to Multiple Online", and are
interchageable with these.
- It will do backups at the end of any hour a ledger or company has been
updated in.
- The backups take from a few seconds to a minute to complete.
- The program monitors the amount of free disk space, and tailors its
operation to fit.
- Older Backups are deleted as newer ones are made, so the disk
space used remains fairly constant.
- The last backup for a financial period is retained.
- The program shows the numbers of backups stored and the disk space
used.
- Backups can be deleted manually using the convenient "Admin"
button.
- Backups can be made manually - click the "Manual Backup" button.
- Backups can be restored using this program - click the 'Admin" button.
This will give a list of backups stored, and you can right click
on the one you want and restore.
- The restore also has a new option "Restore to another Company".
This means you can restore a ledger to a different company number
while still continuing work on the original company. Note this
makes it very convenient to run reports again, or look at past
information while the current work on the main company number continues
uninterrupted. This is especially useful for legal sites where you
or the Auditors may want to run reports again for a previous period.
- You still need to do regular backups to either tape drives or CD's or
DVD's as well, however this option is much easier to restore from and
gives many snapshots of points in between the backups.
Here are some screenshots.
1 - the program has been started, and work has been done on this or other
screens. So far the program has scheduled some backups to run.
Note this happens automatically - the program has been monitoring
which companies have had input done to them.
2 - The backups above have been done:
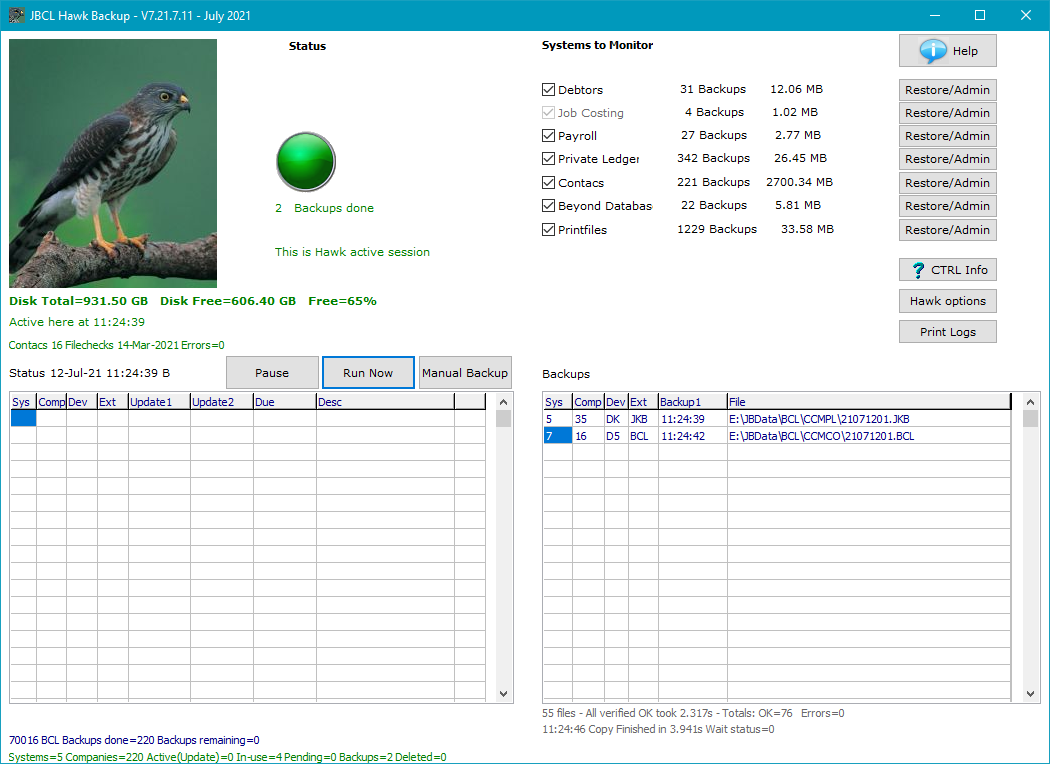
Note the number of files changed since the last backup, and the time
taken are shown in grey under the backup list for the last backup that has
run.
(In normal operations these backup would have run on the hour
at 16:00).
If backups on the hour have been pending, you can make them run sooner by
clicking the "Run now" button, as above. This is useful if you want to
shut the PC running the Hawk backup down without waiting until the backup is
done.
3 - How to administer or delete or restore from these backups:
This example shows how to pick and restore from one of the Private Ledger
backups. You click on the "Admin" button next to Private Ledger, and
the backups are shown. The names of each are the dates - eg the one
highlighted 07062904.JBC is for 29 June 2007, and was number 4 for
that day. Rightclicking on this backup shows the options below.
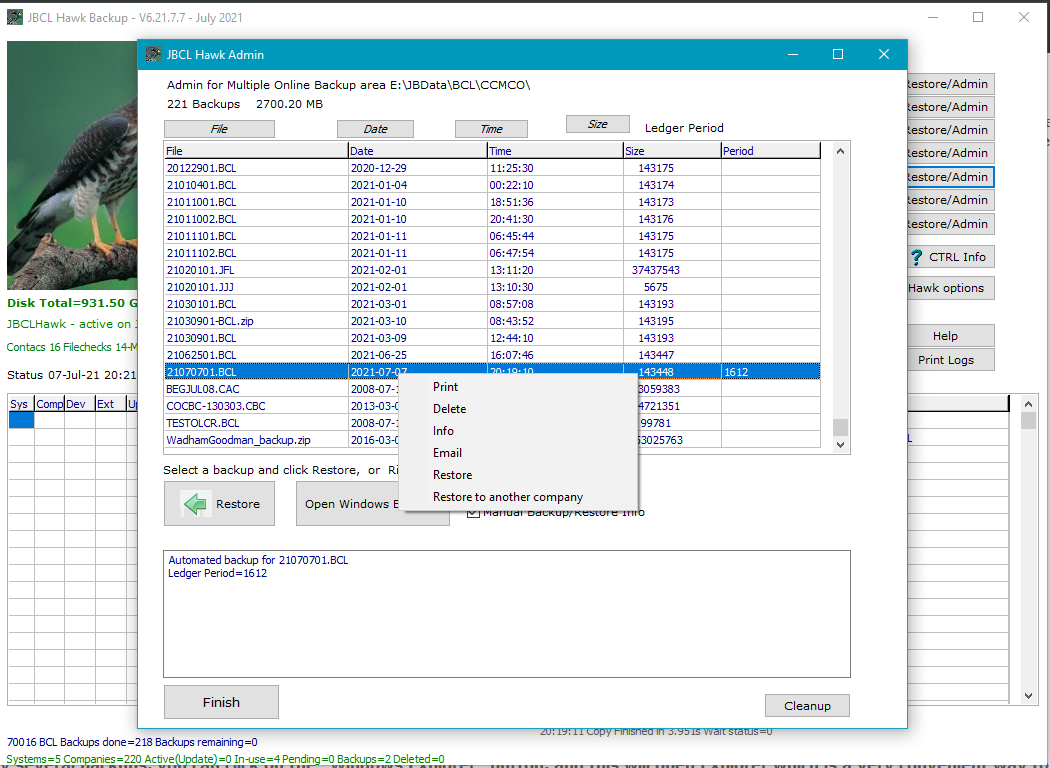
If you want to either delete or copy several backups, you can click on
the "Windows Explorer" button, and this will open Explorer which is a very
convenient way to do this.
How to run JBCL HawkBackup
automatically
For BCL users it is useful for the main operator to have this program run
automatically on their PC. The program is configured to start with
all the default options set and needs no further setups. As long as
it is running it will:
- Start monitoring BCL systems for ledgers to backup immediately
- It will do snapshot backups on the hour for all ledgers and companies
that have had updates
- Note this program is designed to run on only one screen on a network,
so the screen that is in se by the operator is the most likely screen to
be active and is the best to run this program on
- The backups typically take from a few seconds to a minute or two
depending on the size of the data files. Further input to the
ledger is blocked until the backup finishes.
- The program also cleans up older backups as it goes.
- Once running, there is nothing the operator need do, except check from
time to time that the program is performing backups, which is easily
done by looking at the backup window and noting that backups are being
listed in the lower right corner of the screen.
- Manual backups can also be done at any time with the Manual Backup
button
- If automated backups are pending but not due for some time, these can
be forced to run now by clicking the "Run Now" button. ALl this
does is change the due time to now rather than the start of the new
hour, and the backups will run shortly.
To set the JBCL Hawk Backup to run automatically, open the Windows startup
folder by Clicking Start and Run "shell:startup" and creating in this folder
a shortcut with the command:
C:\JBCL\Prog\JBCStart.exe Program JBCLHawk.exe
(this will load the latest version and run it).
(For Vista/Windows 7/Windows 8 this folder
is at
C:\Users\Username\AppData\Roaming\Microsoft\Windows\Start
Menu\Programs\Startup
The above command shell:startup should open this folder)
To open this folder in Windows 10 - open Windows Explorer and type startup
as the folder name.
If you wish to start several programs at once, then use a command like
C:\JBCL\Prog\JBCStart.exe Programs JBCLHawk.exe ATClockW7a.exe
(this will start the JBCL Hawk Backup and
the desktop clock)
Some advanced features of this backup:
There are
some refinements in the program to make it display how long it
actually locks out the ledger as it takes a copy of the data
files. It only starts the backup when the ledger is not in use - if
it is it waits until the ledger is not in use. On a typical
network you can expect the time you are locked out for is only about
10-30 seconds - the program copies the data files elsewhere before it
compresses them so most of the backup time is done not on the working
copy, and the ledger is then again available for input even before the
backup is completed. And the further advantage is that
an extra backup is left off the server - on the PC running the
Hawk Backup - as an extra backup.
The time and other details taken for the last backup is displayed in
light grey below the backup list.
Further smart features are planned to be added to this program to
backup logs and reports.
Note - Great ideas appear in more
than one place!
This backup idea seems to have become popular now.
Since I wrote this program, Apple OSX Leopard has released an
acclaimed backup program Time
Machine with many similar ideas. Here are comments from
a review of the Leopard
http://computerworld.com/action/article.do?command=viewArticleBasic&taxonomyName=disaster_recovery&articleId=9044339&taxonomyId=83&intsrc=kc_feat
At midnight, or as
soon thereafter as your computer is on and the backup drive available,
the most recent hourly backup will be saved as a daily backup, and
earlier hourly backups will be deleted to save space. Each daily backup
is maintained for a month. After a month, Time Machine converts one of
those daily backups into a weekly backup that it preserves indefinitely
(or until your backup drive becomes full).
When a drive becomes
nearly full, Time Machine analyzes its backups and deletes files in a
method designed to preserve as wide a range of backup dates as possible
while still allowing you to have a fully restorable backup of your
current system. If you are concerned about losing any potential backup
files, you can configure Time Machine to warn you when it runs low on
disk space.
Time Machine's
approach of keeping frequent recent backups and fewer older backups may
seem unorthodox, but it really is brilliant when you think of Time
Machine as a safety net. If you want to revert to an earlier version of
a file you're working on or if you accidentally delete something, you
usually know it very quickly. Having hourly backups means you can go
back through your version choices easily -- it functions almost like a
universal-undo feature. It also means that if you have a hard drive
failure, you will have an extremely recent backup to restore from, and
there will be almost no data loss.
The balance to this
is disk space and the ability to find files. Sorting through hourly
backups from six months ago would be like looking for a needle in a
haystack, and storing all those backups could theoretically require
several terabytes of disk space. Having a day's worth of hourly backups,
however, offers an incredible value and makes Time Machine more useful
in the daily use of your Mac. It really is revolutionary to add this
capability on top of the typical once-daily (or less-frequent) approach
of other backup tools.

To Index
JBCL Printing
This is an equivalent to the Beyond "Operate Printer" program. Most of
the functions are present here:
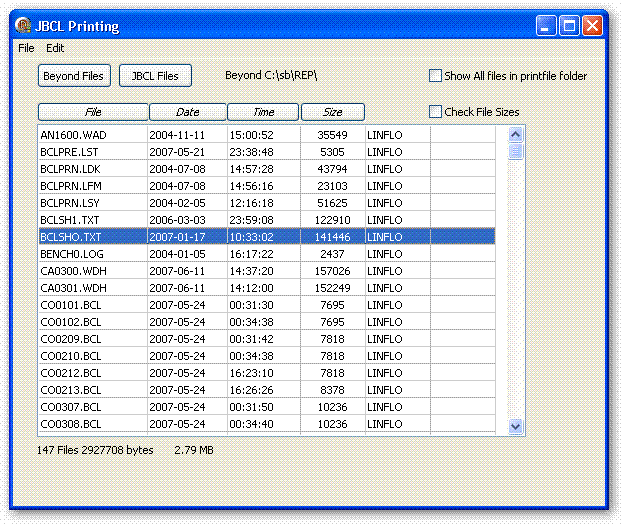
To print, right click on a file and select one of the options:
View/Print/Delete/Email.
There are also options to see files in the report folder that are not in
the Register. Often a file you are looking for which cannot be found
in the Register can be found this way.
To Index
Advanced Options
Great features of the JBCL environment are:
- All programs and settings are stored in a central place - in a network
on the server. This makes configuring and updating simple for the
network administrator.
- Programs do not have to be installed on each work station.
- Updates are loaded in one central place.
- Some JBCL programs are unrestricted, some programs are licenced.
Licences are for concurrent access - that is in an office of 20
screens if only 3 will be using a certain program at once, then only 3
licences are needed, and these can be used by any of the computers on
the network, but only 3 at once.
- The JBCL programs work with the same data as the older BCL
programs. No conversions are needed. JBCL and BCL
programs can be used at the same time interchangeably.
To Index
How-To and Common Questions
To Index
JBCL Folders
Technical reference for those
installing JBCL
JBCL is normally installed into 2 folders, whether for a standalone PC or a
PC on a network. This applies to Windows XP, or Vista or Windows 7.
(1)
JBCLMain (used to be called JBCLUpd)
This folder is where shared settings and data files are stored, and also a
central place where program updates are loaded.
For a standalone PC, this folder will default to C:\JBCLMain
If on a network, then put this on a drive that has the same mapping to all
workstations.
eg so setup a mapping of drive F to a data folder on the server, and
create a JBCLMain folder below this.
Example:
You may want to place the JBCLMain folder on the server at D:\DATA
so on the server create a folder
D:\DATA\JBCLMain
For all PCs, map drive F to the D:\Data folder on the server
So if the shared drive is drive F:, then the main
JBCL folder can be at F:\JBCLMain
as seen from the PC's
JBCL Software is normally installed by running an installer
JBCLIns.exe after having saved it to this folder - eg F:\JBCLMain or
C:\JBCLMain
This sets up folders and copies base programs and help to where they need to
be.
For individual workstations all that has to be done is create a desktop
shortcut to a startup program:
For a network PC, setup a shortcut called "JBCL Start" to the
program "F:\JBCLMain\JBCStart.exe" (if F is the mapped drive
letter)
Note - on older sites the Folder may still be called JBCLUpd, this is no
problem.
As long as the folder name agrees with the settings files, this will work
fine.
These settings are in the file JBCLMain.ini in this folder which is also
copied to the C:\JBCL folder.
(2)
C:\JBCL
This is the local working folder for one screen. The JBCL startup
program will create this and its folders automatically.
Features of this setup are:
- JBCL installs nothing in the registry
- All settings and configurations are stored centrally in the JBCLMain
folder, (and in the Settings folder below that)
- Individual screens need no installation - just creating a shortcut to
the startup program is enough.
- For a standalone PC, setup a shortcut called "JBCL Start" to
the program "C:\JBCLMain\JBCStart.exe"
- For a network PC, setup a shortcut called "JBCL Start" to the
program "F:\JBCLMain\JBCStart.exe" (if F is the mapped drive
letter)
- This startup program does all local folder setups and copying of
program updates as required.
- Program updates can loaded into the JBCLMain folder even while the
JBCL programs are in use.
- Once JBCL is set up and running on a PC, an alternative quick start
shortcut can be set up to run the JBCL Menu program in the local folder
- For this quick start this setup a shortcut called "JBCL Menu" to the
program "C:\JBCL\Prog\JBCLMenu.exe"
- (this quick startup will tell you when program updates are
available).
- Note - Set the "Start in" folder to be "C:\JBCL" (not
C:\JBCL\Prog)
- JBCL on a network can be migrated to a new server by simply copying
the JBCLMain folder to the new server, and setting the same drive letter
(eg F:\) on the PC's to point to the new folder
- JBCL recommends you follow this twin folder setup even if you are
running only one or two programs, as it is simple to administer and
troubleshoot.
- All settings for for the folders are centralised in one settings
program call JBCLSets.exe. This stores settings in files called
JBCLMain.INI etc
- If a program stores data or settings, it is better to use this folder
structure.
- Some programs such as JBCLCalc or ATClock which need no stored
settings can be placed in any folder and run from there.
Other folders
Under the JBCLMain folder there will be a few other folders, such as
Settings, Help, Data, Sounds, Images, Logs, Temp
These folders store shared resources used by all the screens
Under the JBCL folder there will be a few other folders, such as Settings,
Data, Cache, Logs, Prog, Rep, Temp, System
These folders are used for files only for this PC.
In general if you upgrade to a new PC you will not need to retrieve or copy
anything from these folders.
Some of the settings files may be useful for individual preferences - these
are seen in the settings screens under a tab "Settings for this screen"
Note - All of the "settings for this screen" settings and data files used in
About Time Professional (Time Recording) are stored on the network or shared
folder.
Advanced setup
By default all JBCL screens on a network have the same shared folder -
ie always the same drive letter and path (such as F:\JBCLMain). This
is stored as the default setting called "JBCL Folder Setup 1"
If you want to run JBCL from a remote connection or direct
from the server hard disk you may not have the mapped drive, or
different paths. In this case you will need to use a different folder
setup. JBCL caters for this, but this should be used with care.
Contact JBCL for help on this.
JBCL on a network can be migrated to a new server by simply copying the
JBCLMain folder to the new server, and setting the same drive letter (eg
F:\) on the PC's to point to the new folder
To Index
Future Ideas
To Index